The same, but different. Today’s post features an interesting pair of games played in the Two Knight’s variation for your interest.
Sometimes in chess you see a pair of games that bear a striking resemblance to one another in terms of strategic ideas and tactical motifs. Of course, it makes more sense when the games stem from the same opening variation, but when they’re played almost exactly 18 months apart and played against the same opponent, it’s a bit uncanny.
A couple of Saturday’s ago I played for Calderdale ‘A’ in their first match of the new Woodhouse Cup season against York ‘B’. I played on board 4 and found myself operating the White pieces against Paul Johnson. As far as I can recall, I’d only played Paul once before. That was in the Leeds League a couple of seasons back. I’m blessed with a fairly good memory (for the moment at least) and can recall some details about games I’ve played against a great many players but this one is imprinted on my memory particularly strongly because I considered it to be a game in which I played pretty well – as it turns out I was pretty wrong – I didn’t play it at all well! This wasn’t a typical ‘Dave Shapland’ hallmark game full of complications and chaotic tactics. This one was quite positional and reasonably controlled. Perhaps because of that, I remember it even more keenly.
That game was played on the 4th of April 2018. The game the other week was played on the 5th of October 2019. Almost 18 months later to the day. The similarities didn’t end there though. In both games Paul played the Two Knights Defence and we entered what is sometimes called the Modern Variation where White plays 4.d4 and 5.e5. This is a line I’ve been playing consistently against the Two Knights for a few years and have been learning its subtleties. It’s an interesting variation.
Perhaps remembering something of that game 18 months ago, and also taking advantage of a sub-optimal move order on my part, Paul played a slightly different line in the second game. However, the strategic themes that emerged were very similar to the first game. White gained a king’s side pawn majority which became more of a telling factor as the game progressed. Black had a majority on the queen’s side but his structure was damaged because he had a doubled c-pawn. On the credit side, Black used the half open b-file for counter play.
Another theme of this variation is White’s attempt to establish strong control of the dark squares. Especially important are the squares on c5, d4 and e3. White aims to control these squares in order to blockade Black’s potentially mobile c and d-pawns so that he can then launch his own attack on the king’s side using his pawn majority there. It’s a classic endeavour to strangle the opponent’s counter play on one wing in order to buy time for an assault on the other.
Of course, that sounds very simple, but in any game it is impossible to maintain complete control throughout and at some point tactical operations will be necessary. Such was the case with both these games. In both games found I needed to make a judgement and take a clear decision to abandon the positional approach in favour of a more concrete method at some point. You’ll see that happen quite clearly in each example I think.
But, going beyond the strategic ideas, the two games that are the subject for today’s post even have tactical motifs that carry more than a passing likeness. Take a look at what I would consider to be critical positions from each game and compare them.

Shapland vs. Johnson, Leeds League, 2018
In the first position (top) from the game in 2018 it’s White to move. I’d sacrificed a pawn in order to centralise my king and queen and set up the tactical sequence that now follows. I played 43.f6+ Kg8 44.Qe8+ Kh7 (note that if 44…Qf8 then 45.f7+ forces the king away and wins Black’s queen) 45.f7 Qa3+ and there followed a short sequence of checks from Black which I had carefully calculated an escape from. After that it was impossible for Black to prevent me making a second queen and winning the game.
In the second position (bottom) it’s Black to move but he’s threatened with exactly the same tactical idea. White wants to use a discovered check and play 47.e7+ which will force home the e-pawn rather than the f-pawn on this occasion. So, to avoid this my opponent found the tricky move 46…Qd3. Now 47.e7+ doesn’t work because then …Qxd5+ 48.Re4 Qxe4 is mate! But instead White wins with 47.Qxd3 exd3 48.e7! dxe2 49.e8=Q+ Kh7 50.Qxe2.
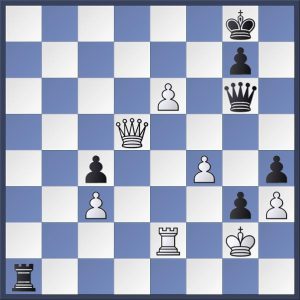
Shapland vs. Johnson, Woodhouse Cup, 2019
The two positions are remarkably alike aren’t they? In both, White has been able to exploit his king’s side pawn majority to break through. In both, White’s pieces are very well placed on central squares and operating harmoniously. In both, Black has an opportunity counter play with his passed pawns or pawn but doesn’t have time to exploit their potential. In both, White’s discovered check with a pawn advance is a deadly threat.
I know these kinds of thematic ideas crop up all the time in chess but in two games against the same opponent it feels a bit spooky.
I’ve published both games in full below. I hope you’ll enjoy them. I think they are quite interesting, both individually and as a pair.
It’s remarkable how similar those positions are! Obviously he didn’t learn from the first time…