“What did we learn Palmer?” J.K. Simmons plays a mystified CIA Superior in ‘Burn After Reading’
That was something like the question Matthew Parsons asked Nick Sykes and I as we drove back from the final round of the Calderdale Congress just over a month ago. Matthew was, of course, trying to be helpful and draw some lessons from a full on weekend where we had all played 15-odd hours of chess. We were pretty frazzled and couldn’t come up with much of a coherent answer. It reminded me strongly of an amusing exchange at the end of the film ‘Burn After Reading’ where two confused CIA officers sift through the wreckage of the farce that has gone before, desperately trying to make sense of it.
CIA Superior: What did we learn Palmer?
CIA Officer: I don’t know, sir.
CIA Superior: I don’t [blooming] know either. I guess we learned not to do it again.
CIA Officer: Yes, sir.
CIA Superior: I’m [jiggered] if I know what we did
CIA Officer: Yes, sir, it’s, uh, hard to say.
It’s a very funny film and well worth watching if you haven’t seen it.
Anyway, I think my point is that sometimes you need a bit of time to put perspective on events and draw conclusions. I think I can speak for the three of us in the car that night, and perhaps for Pete Leonard who also played in the competition, that the Calderdale Congress highlighted just what strange decisions people can make when they are fatigued and under pressure. There were several pretty stark and tragic examples of this that we were involved with during the three days of action. But first, just to illustrate it can happen to anyone. Take a look at this simple endgame position
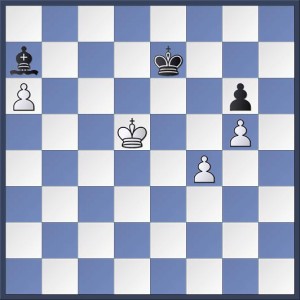
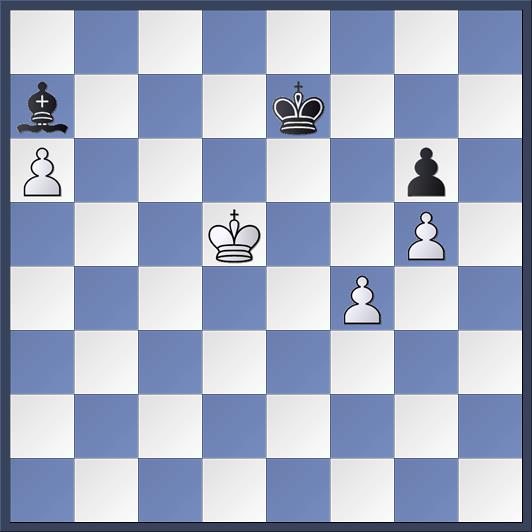
Hammer vs. Topalov, Norway Chess 2015
This game (right) was played in the recently concluded Norway Chess 2015. In this position, having defended tenaciously for quite some time, White simply needed to find the reasonably straightforward 74.f5 gxf5 75.Ke5 in order to exchange off the last Black pawns and guarantee a draw. Tragically, he played 74.Kc6?? and when his opponent replied with 74…Ke6 he released his error and had to resign at once. In the post-mortem interview after the game Topalov accounted for his opponent’s lapse by suggesting that White had anticipated that Black would play 73…Bb8 after which 74.Kc6 is indeed the best move. That sounds plausible but it’s still a pretty terrible mistake to essentially play a move without even consciously registering what your opponent has just played!Even more extraordinarily, this was not the first point that Veselin Topalov had ‘donated’ to him by a Norwegian in that tournament. The World Champion, Magnus Carlsen, arrived a little late for his round 1 game with the Bulgarian and missed the arbiter’s introductory talk explaining the various time controls before the clocks were started. Consequently, when he got to move 60 he thought that he would get 15 minutes added to his clock and sat thinking about how best to convert his winning advantage in a queen and pawn ending.
However, Magnus had a rude surprise in store because he did not in fact get more time added to his clock and was instead obliged to play on increments of 30 seconds per move. Consequently he over-stepped the time limit and lost. It was a result that upset his equilibrium for three or four more rounds after this one as he started with only ½ out of 4!

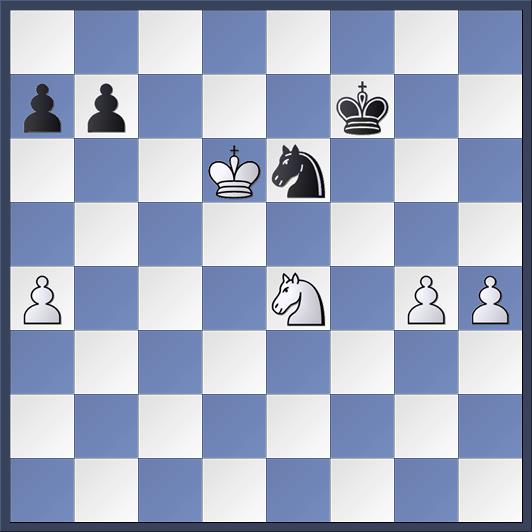
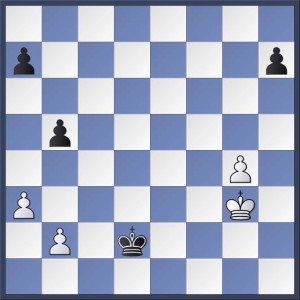
Connor vs. Shapland, Calderdale Congress (Major), Round 5
So, even the World Champion is not immune to making elementary mistakes that cost him dearly. However, the Hammer example is one that more of us can probably identify with and it just goes to show what six hours of intense concentration can do to your brain. Even the simplest tasks become terribly difficult. For us chess mortals it doesn’t take anything like six hours for this kind of hypoxia-effect to take hold. At Calderdale for example in my last round game my opponent and I had been playing for barely three hours (though it was the second game of the day!) when we reached the position on the right.
White had absorbed a significant amount of pressure during the middle-game and early endgame and has reaped the reward for his resilience because I had lost the thread of the position and now found myself in a hopeless situation. Only my willingness to try and help my club colleague get a share of second/third prize (by salvaging a draw) prevented me from resigning. However at this point I saw that, if White naturally enough elected to exchange off the knights on g5, it was possible for him to then play inaccurately and give me a chance to hold.
So, White did indeed play 56.Ng5+ (there were many other winning moves but this is still sufficient) Nxg5 57.hxg5 a6 and now White needs to play precisely to win the game. For example, I had seen that if 58.Kc5? then b5 comes and Black will liquidate the queen’s side pawns and then capture the doubled g-pawns to hold the draw. The correct response is 58.a5! after which White can capture en passant if 58…b5 comes and so White wins. What I could scarcely have imagined was that my opponent would play 58.Kc7?? which actually loses to the same pawn advance. After 58…b5 White is lost.
Did I deserve this win and the accompanying prize money that I had now swindled from my club colleague? No, of course not, but chess is not a just game. Only in the previous round I myself had made a similarly catastrophic over sight in a king and pawn ending, but I had escaped with a draw.
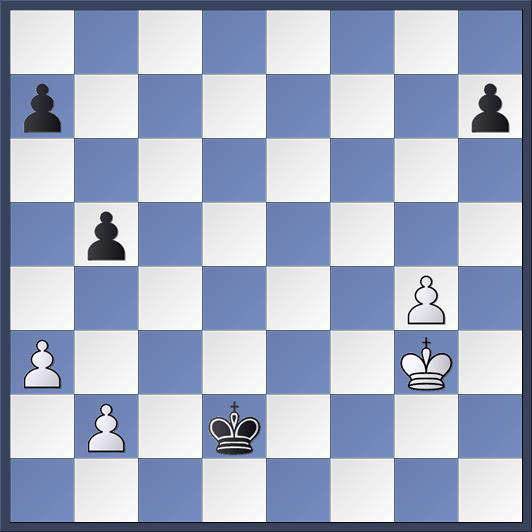
Shapland vs. Sykes, Calderdale Congress (Major), Round 4
On the right is the position close to the end of the game with Nick Sykes (which is well worth playing through in its entirety because it’s extremely interesting). I had just acquiesced to exchange rooks on d2 thinking that the resultant king and pawn ending was at worst drawn. However, this was based on me simply counting the moves that it would take for both I and my opponent to queen a pawn. After 42.b4 Kc3 43.Kf4 Kb3 44.Kg5 Kxa3 45.Kh6 Kxb4 46.Kxh7 Nick chose to queen his a-pawn by continuing with 46…a5. This is just as quick as moving the king and queening the b-pawn but there is a crucial difference because, what both of us had overlooked, was that the b-pawn queens with check and then Black can force the exchange of the White queen and win the game with his remaining a-pawn!
OK, so this example is slightly more difficult to spot and calculate compared to the previous example. Especially from the point at which I had to decide on whether or not to exchange the rooks. What it does illustrate though is that in concrete positions like king and pawn endings, it’s vital to calculate accurately and look beyond the move that you think is the ‘last one’ in the variation because it may turn out not to be the case!
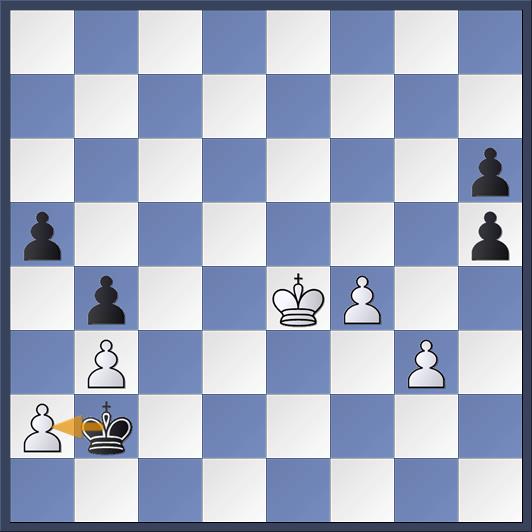
In king and pawn endings finding the correct method of proceeding is absolutely imperative as any mistake is usually terminal. Sadly, Pete learned this lesson to his great cost in the very first round as he, having obtained the winning king and pawn ending below, stumbled almost as he was crossing the finishing line.
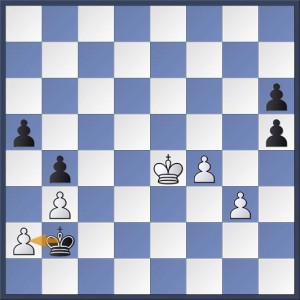
Leonard vs. May, Calderdale Congress (Major), Round 1
In the last of the diagrams in today’s post (right), Black has just played 45…Kb2 and here the same ‘counting-the-moves’ technique mentioned above is relatively straightforward. It will take four moves for White to queen a pawn f5-f6-f7-f8=Q whilst it will take Black six moves Kxa2-Kxb3-a4-a3-a2-a1=Q. That calculation should be enough to have any player stop ‘thinking’ and start blitzing out the remaining moves. But on this occasion, agonisingly for the kibitzers willing Pete on, he suffered an aberration and thought he needed to follow the Black king to the queen’s side. Then after 46.Kd3?? Kxa2 47.Kc2? a4 he realised that he couldn’t stop Black from queening and no longer had time even to run his f-pawn.
This was a traumatising defeat on the Friday night which Pete struggled to recover from. His opponent meanwhile went on to beat Dave Shapland in round 2, Nick Sykes in round 3 and then drew with ex-Hebden player Dave Sugden in round 4 on his way to winning the section.
Ok, so that’s enough of the ‘epic fails’ let’s consider some of the more positive aspects of the congress. In the Major Nick Sykes played a very nice game indeed on Saturday morning to crush Mike Connor with some considerable ease without it ever being really all that clear what Black had done wrong. Besides this, as mentioned earlier, his draw with me in round 4 was very interesting and unusual. Both these games are annotated by Nick in the game viewer at the end of this post and I’ve has also annotated the same game so if you are really keen you can see what each player was thinking as the game progressed.
I had an unusual weekend because I managed somehow to avoid castling in all of my first four games! In the first two rounds this was quite voluntary and probably rather dubious in each case. In round three my opponent unleashed a combination on f7 which forced a recapture with the king and finally in round 4 the game went into a queen-less middle game where castling was not so important. The round 1 game is certainly worth looking at on the sole basis that it is quite interesting.
Pete recovered from his tough round 1 defeat to bounce back in round 2. Sadly he had another set-back in round 3 before closing the tournament out with two draws. Interestingly, there were no White wins in all five of Pete’s games. Pete has been kind enough to send us all of his annotated games (as has Nick) and I’d recommend that readers take a look at some of the interesting variations that appear in the round 4 match-up.
Matthew Parsons played in the Open Section and seemed not to suffer from any of the kinds of tribulations the rest of us experienced. He too has sent us his games and he had a good weekend where he was always in contention for the top prize, winning some nice games along the way. Sadly, his run came to an end against John Surtees in the final round but Matthew acquitted himself very well even in this game and enjoyed playing it despite the result. Three points was still enough for joint second place.
So then, now that we’ve had 6 weeks or so to reflect on the games from the Calderdale Congress, what did we actually learn? Here are my thoughts:
- Calderdale was a sharp reminder for me that congress chess is very different from evening league chess. The games are longer, generally tighter and because every individual results matters, it’s more stressful.
- The ending is the phase of a chess game that demands the highest level of precision and yet it is the phase of the game that you have to execute when you are most fatigued − therefore expect mistakes to happen.
- Even though calculation is vitally important in chess endings, having a plan is also crucial. If you can figure out how to achieve your objectives then you can sharpen the focus of your calculations towards the winning method.
- Just because you played most of the game to a good standard, doesn’t mean that you’ll win (or even deserve to win) the game.
- Above all we learnt that, whatever it was we did, not to do it again!