Nails were most definitely bitten at The Trades Club on Monday night as Hebden Bridge ‘A’ came very, very close to losing their unbeaten record to Huddersfield.
The Calderdale Evening Chess League division 1 title race is really hotting up as, on Monday night, the teams played the ninth of fourteen rounds. We’re at the business end of the season now and the destiny of this year’s title most definitely hangs in the balance.
This week title holders Todmorden ‘A’ hosted Belgrave ‘A’, current league leaders Hebden Bridge ‘A’ hosted their old foe Huddersfield and 2013-14 champions Halifax ‘A’ played Hebden Bridge ‘B’ whilst Halifax ‘B’ had a week off.
At Todmorden the champions found themselves weakened by the absence of Martin Hamer and Pete Mulleady but they still managed to field a team with an average rating of 165! Replacements Alistair Wright and Mick Connor can hardly be considered as weaknesses. Indeed, both played their part in a tight 3½ – 1½ victory where the home team displayed their resilience by remaining unbeaten on all 5 boards. No small feat with the Black pieces. The top two boards and board 4 were drawn (with Phil Cook drawing with Ian Hunter on top board in what could be a dress rehearsal for the final round of the Calderdale Individual Championship) with wins by Dave Patrick on board 3 over Karim Khan and Mick Connor on board 5 over Mike Barnett proving decisive.
Hebden Bridge ‘B’ were due to host Halifax ‘A’ but the fixture was switched to Lee Mount after the corresponding fixture in the first half of the season was played at The Trades Club. Hebden ‘B’ still played with the Black pieces though. Sadly, Hebden were again struggling to put out a full line up and defaulted board 5 but the remaining four players put up a terrific fight. Andy Leatherbarrow has been having a golden season (he’s only lost one game so far) and he put in another legendary performance to take Darwin Ursal’s scalp on board 1 (the rating list shows a whopping 58 point difference between the two though we all know what Andy is capable of) while captain Martin Syrett held Winston Williams to a draw on board 2 (overcoming a 47 point rating difference).
Sadly that was as far as the resistance went as John Lavan went down to John Morgan on board 3 and Neil Bamford lost to Richard Porter on board 4. Here’s full confirmation of the individual results:
Hebden Bridge ‘B’ vs. Halifax ‘A’
A.Leatherbarrow 1 – 0 D.Ursal (White)
M.Syrett ½ – ½ W.Williams (White)
J.Lavan 0 – 1 J.Morgan (White)
N.Bamford 0 – 1 R.Porter (White)
DEFAULT 0 – 1 S.Scurfield (White)
1½ – 3 ½
On paper the juiciest tie of the round always looked like being Hebden Bridge ‘A’ against Huddersfield. These old enemies have played out plenty of epic battles over the years although in more recent times Hebden have had the edge – in fact the last time Huddersfield won was on 22nd September 2014. Perhaps it was their time to win again.
Both teams fielded slightly unusual line ups. Hebden were missing the services of Matthew Parsons and Pete Leonard but drafted in Chris Bak and John Allan as replacements alongside Andy Bak, Dave Shapland and Nick Sykes. Huddersfield meanwhile were without regulars Greg Eagleton, Mitchell Burke and Dave Tooley but they still brought a competitive side with Leo Keely and Dave Keddie on boards 1 and 2 and Steve Westmoreland, Robert Sutcliffe and Bryn Charlesworth completing their line up. On paper Hebden looked much stronger on the lower boards with the top two boards looking more closely matched.
Of course what looks likely from an analysis of the statistics before the match often bears no relation to what actually takes place. This match turned into an epic struggle with all five games ending decisively. Right from the off the outcome looked in the balance as two of the five boards were decided relatively quickly. First of all Andy Bak had a bad day at the office against Leo as his double edged opening choice of the Schliemann Variation of the Spanish backfired. He first lost the exchange for a pawn and then blundered into a pawn fork that lost a piece. All this compelled his resignation before the players had reached the 20th move. A game to forget for Andy.
Hebden bounced back quickly though as John Allan made fairly short work of Steve Westmoreland. The Tarrasch Variation is not a popular choice against the Queen’s Gambit these days and Steve, who is normally very well prepared in the opening phase of the game, seemed to be caught a little bit cold. He lost a piece in the opening and after that John offered him no hope of recovering as he simply exchanged material and achieved an overwhelming advantage in the end game. 1 – 1.
Somewhat later on Nick Sykes made it 2 – 1 to the hosts as he converted smoothly against Bryn Charlesworth on board 5. It was a solid performance from Nick who has only lost three of his seventeen games this season. He met Bryn’s offbeat choice of the Nimzo-Larsen opening in principled fashion and slowly outplayed his lower rated opponent winning an exchange and then grinding out a win.
Hebden were in front but the remaining two games looked very worrying indeed for them by the time Nick had put them in front. On board 2 Dave Keddie and Chris Bak were playing a Classical Variation of the French Defence and it appeared that Chris had chosen a fairly unusual approach. In the middle game he overlooked a tactic that cost him a pawn and Dave found a clever way to maintain a passed pawn on f6. Chris was hanging on but White was clearly better.
Meanwhile on board 4 Dave Shapland had reintroduced the Budapest Counter Gambit to his repertoire against Robert Sutcliffe. The opening seemed to be going according to plan for Dave until it became clear that Robert was going to break with orthodoxy by castling queen’s side. This was a smart move because Dave burned way too much time on his clock trying to find a way to take advantage of Robert’s choice but in the end couldn’t find any way to improve on Black’s regular plan and the game took a fairly obscure turn.
Later on Dave missed a move order trick that enabled Robert to set up a various dangerous looking battery of two bishop and a queen pointing towards Dave’s castled king. Robert then played very energetically to advance his king’s side pawns in order to break open that side of the board and it was clear that White’s attack was going to be the fastest. Dave sought refuge in complications but was now extremely short of time and in trouble on the board as well.
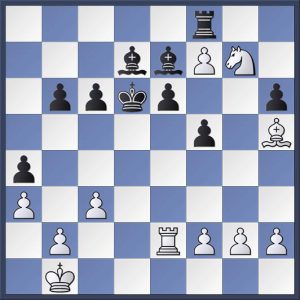
Black (Chris Bak) has just played 30…Kd6 to try and protect his e-pawn. Can you see how Dave Keddie responded? The solution is in the game viewer below.
As both these remaining games reached their critical phases Hebden Bridge seemed in deep trouble but, as so often happens in these tense situations, mistakes changed the course of events. On board 2 Chris, desperately trying to prevent the advance of Dave’s f-pawn fell victim to a very attractive tactic that would have a decisive material cost. Chris chose a different path and went for a walk up the board with his king only to be caught in a mating net. It was 2 – 2.
The final act of the evening was no less dramatic as Robert and Dave approached time control with Dave down to his last minute on the clock. Suddenly Robert started playing quickly too although he had more time to think. A forcing line appeared in which it looked like Robert could grab a pawn and open up Dave’s king to a decisive attack. However, he’d missed an intermezzo from Dave’s queen which cost him the bishop and the game was suddenly over.
The Hebden players breathed a huge sigh of relief and congratulated their opponents on a ferociously hard fought encounter. The final scores were:
Hebden Bridge ‘A’ vs. Huddersfield
A.Bak 0 – 1 L.Keely (White)
C.Bak 0 – 1 D.Keddie (White)
J.Allan 1 – 0 S.Westmoreland (White)
D.Shapland 1 – 0 R.Sutcliffe (White)
N.Sykes 1 – 0 B.Charlesworth (White)
3 – 2
You can find a number of the games played on Monday night in the game viewer at the end of this post.
These results mean it’s ‘as you were’ in the league table. Hebden Bridge ‘A’ stay top on 14 points. Halifax ‘A’ are second on 12 and Todmorden ‘A’ are third with 11 although they have a match in hand on the other two which could bring them within a point of the leaders. Huddersfield have 9 points and now seem to be out of contention for the title although with Todmorden and Halifax still to play, they could yet have a bearing on the outcome.
At the other end of the table Belgrave ‘A’, despite running a number of the top teams very close have only 4 points and are not clear of the relegation dog fight as Hebden Bridge ‘B’ and Halifax ‘B’ are both on 2 points. It seems likely that the games between these three teams will decide which one of them goes down.
In the next round of fixtures on 27 February Hebden Bridge ‘A’ will travel to Todmorden ‘A’ for an absolutely critical encounter. Hebden have yet to lose a match but they have drawn two, one of these was against Tod. It should be enthralling especially if both teams are able to field their strongest line ups. Halifax ‘A’ have a week off and so you can imagine they too will be fascinated to see the outcome of his tie.
While this is going on Belgrave ‘A’ will play host to Halifax ‘B’ in the relegation battle of critical import. If Belgrave win you’d have to fancy that they wold guarantee their safety.
The final match sees Hebden Bridge ‘B’ on the road again at Huddersfield.
The Trades Club also saw another one of the inaugural Handicap League fixtures as Hebden Bridge played host to Belgrave while at Todmorden another match was played between Todmorden and Halifax. The final round of fixtures is due to be played on the 10th of April and there is a postponed match between Belgrave and Todmorden to be re-scheduled.
At Todmorden the home team put out the stronger side but as a result gave their opponents a 3½ point head start. They did manage to overcome this with a 5 – 1 ‘over-the-board’ score to take the match 5 – 4½.
At Hebden Bridge John Kerrane took the opportunity to field an all-junior line up against the visiting Belgrave side. What’s more, as the visitors came with only five players, he was even able to add a further player (Martha Leggett) to their team in order to make sure everyone got a game. This is really what the handicap league is all about, giving League 2 players more opportunity to play games and for the juniors, every game is great experience.
When the handicap (average rating difference between the two teams) was calculated Hebden also started with 3½ points but they too were overhauled by their more experienced opponents. Only the ‘enemy in the midst’ of Belgrave’s ranks lost her game as the visitors match Todmorden with 5 – 1 win at the boards and a 5½ – 4½ win over all. Below are the individual scores for the match.
Hebden Bridge ‘H’ vs. Belgrave ‘H’
O.Buchan (W) 0 – 1 D.Colledge
L.Curry 0 – 1 A.Gonzalez (W)
A.Dermo (W) 0 – 1 A.Dawson
B.J.S Hadari 0 – 1 S.Harrington (W)
J.Y.Hadari (W) 0 – 1 R.Bottomley
T.Dodd 1 – 0 M.Leggett (W)
Handicap 3½ – 0 Handcap
4½ – 5
The outcome of this league is also completely up for grabs with Halifax, Belgrave and Todmorden all in the hunt.
I’ve only lost 3 in 20 good old chessnuts still has 3 results missing (none of them losses).
Robert played really well in his game and was s shame for him he made such an unfortunate error at the end. I’m surprised he didn’t take on f6 at once with the bishop?
With Andy’s game when you play the Schliemann you can lose like that
Chris playing the Burn Variation seems a bit lifeless I always preferred 4…Bb4 The MacCutcheon!
My game shows, the best way to beat me is not to play offbeat stuff! Play main lines ?
In Dave’s game, it was amazing how quickly it turned around from being a position where Black had apparently comfortably equalised to one where Black looked to be in huge trouble.
The Ra6-e6-e7 maneouvre seemed to be a waste of time. Maybe ..Ra6 was OK but once he committed Qside, I’m not sure what the point of …Re6 was. …d6 and …Be6 looks more natural and you can keep your rook on a6 to attack White’s Qside somehow.